Posts

Showing posts with the label Technology

Cloudera Quick Start VM in Hyper-V

Image
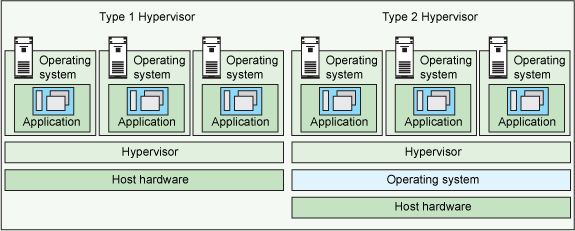
Overview Marc Andreessen penned his now famous essay, “ Why Software Is Eating the World ” in Wall Street Journal in 2011. However, if we dig under the covers, it's really virtualization that is powering this phenomenon. Today, literally every hardware component such as - processor, memory, network, storage, network load-balancer, network router and switch, firewall are virtualized. In fact, even a user is now "virtualized" especially in scenarios such as load testing and synthetic monitoring. Finally, as a concept, money is also virtualized in the form of crypto-currencies. In this post, let's go through how we can implement virtualization in a local machine and get better understanding of the concepts of virtualization.  Virtualization  One key aspect, driver and benefit of virtualization is sharing of the physical resources.  Before we dive in, let's define some concepts. Host Machine - This can be a server rack, single server or a desktop/lapto

Azure Chronicles - Scaling Mule

Image
Overview In the previous post , we saw how to install and test Mule run time on a standalone VM in Azure. In this post, we will take it a step further to scale out the Mule run time. There are several ways one could scale a Mule runtime. They are - Anypoint Cloudhub Anypoint Runtime Fabric (internally uses Docker and Kubernetes at the moment) Container as a Service provided by multiple cloud vendors - Google Container Engine, Amazon Container Service, Azure Container Service etc. Build your own cluster with containers As we go down the above list, the level of details we need to get into is more. So, this post will get into explain how to implement option 4 above. We will make use of various technologies and Azure components such as - Docker, Containers and Azure VM Scale Set to achieve it. For those of you are new to these concepts, we will go through each of the steps in detail. Application Let's use the same Mule API that was created in the previous post.

Azure Chronicles - Mule

Image
Overview Continuing from the previous post , I now move to the other end of the spectrum, from Raspberry Pi to the cloud. Microsoft Azure cloud has been making impressive strides in the cloud space, especially among the enterprises. This is an experiment of running the same Mule run time in an Azure cloud server. The server is created in the East US Azure location. I created an A series server (Extra Small) in Azure using the ARM templates. An A series Extra Small server has 1 CPU core and 07.GB RAM. On this server, the Mule run time is on a JVM with 256 MB heap size. Then, I then ran some scripts to perform the following -  Install Oracle JDK 8 Configure the Mule run time (version 3.9) Deploy a simple REST based API in Mule Objective The purpose of this experiment is to test how much load can a very simple REST API in Mule handle, while running on a very low specification server in Azure. I wanted to see how the Mule run time would perform from a performance per

Adventures with Raspberry Pi - Part 4

Image
As we saw in the previous post , we now have Raspberry Pi server setup and integrated with multiple mobile devices successfully, let's try a more complex integration. API's have become the de-facto standard for communicating between devices. But, if we also wanted to implement any logic, data transformation, loose coupling between devices, then we could use an ESB. One can think of the Mule ESB as another form of IFTTT. We can use the multiple connectors to link  up different kinds of devices, services and applications.  Let's two kinds of integrations - event driven and batch. Event Driven In this example, a service pushes data to the Raspberry Pi. Event Driven Flow I am using Anypoint Studio 7 and Mule Runtime 4. A mockup product API is created in the Mule project. This API is exposed as a REST API with a GET operation. When someone calls the API, the Mule flow is executed. In the Mule flow, the data is read from the API and sent via SFTP to a targ

Adventures with Raspberry Pi - Part 3

Image
Continuing from the previous post , lets now build a Chatbot on the Raspberry Pi. If we have some digital media such as music, movies etc. stored in a media server on the Pi, these can be accessed using a Chatbot too. I have used Telegram to build the bot. The Telegram app is available for all platforms - iOS, Android, Web etc. Using the funnily named BotFather from Telegram, anyone can create a Bot account. Once the account is created, the "brain" of the Chatbot needs to be implemented using a programming language and framework. I have use the python based  chatterbot  framework to create a bot called - Frasier (named after the TV Series). The bot in turn interacts with the Plex Media Server API's to search and download the requested media such as a song, TV show or a movie. Telegram currently allows files up to 1.5 GB to be shared via the app. Telegram App in an iPhone requesting a song from a Chatbot running on a Raspberry Pi In the screenshot above, th

Adventures with Raspberry Pi - Part 2

Image
Continuing from the previous post , let us now put the Pi to some practical uses. File Server The Pi can serve as a file server for home use. One could use it to store files for use across multiple computers, backup files, share media (songs, photos and videos) etc. As most of us use Windows at home, you can setup a Samba file server. You can read/write files easily from Windows computers.  In addition, there are Apps for iOS and Android, so you can access these files from mobile/tablets too. You can SSH into the Pi and run the following commands to install Samba sudo apt-get update sudo apt-get upgrade sudo apt-get install samba samba-common-bin You could give all access to the Public folder under /home/pi/ folder using the command -  chmod +777 . Create a Samba user and password using the command - sudo smbpasswd -a pi Configure Samba as shown below - Edit the Samba configuration - sudo vi /etc/samba/smb.conf [share] Comment = Pi shared folder Path = /home/

Adventures with Raspberry Pi - Part 1

Raspberry Pi has been around for a few years. It was initially launched in 2012 by the UK based Raspberry PI foundation . Over the years, many flavors of the Raspberry PI have been created. While the Pi computer has been created as a learning tool, it can be used for some practical use cases too. These can be for both home and business use. Below is my Raspberry Pi setup at home. Imperial storm troopers protecting their precious cargo of Raspberry Pi, Mi power bank and Western Digital hard disk. All the secrets of the empire are safe! #starwars #raspberrypi #stormtrooper #maker #diy A post shared by Rajan (@rajanmanickavasagam) on May 9, 2018 at 8:33pm PDT The bill of parts for the above setup consists of (left to right) - Mi 20000 maH Power Bank USB to Micro USB cable with a power on/off switch Raspberry Pi case with heat sink Raspberry PI Model 3 Class 10 SD Card 16 GB capacity Western Digital 1 TB external hard drive The storm troopers just show

Tech - Lets Chat

Image
Instant messenger applications (like Yahoo Chat) have been around since the beginning of the web, but the web was initially bound by the desktop. With the emergence of mobile, messenger applications (like Whatsapp, Facebook Messenger etc.) have seen a explosive rise. According to recent statistics , billions of messages are shared using these applications. While these messages are largely between humans, technology cannot be far behind. The DevOps movement in the world of IT accelerated the move towards automation. Except perhaps design and coding, a lot of activities such as testing, integration, deployment etc. are becoming automated. One of the last vestiges of manual intervention was tasks like - monitoring, troubleshooting etc. Bots were created to automate these repetitive tasks too. Diagram using iPad App - Paper I decided to explore this world of Chat and Bots, also called by some as ChatBot. There are a few mature frameworks that can help build this capability. C

Tech - Setup CI-CD in under an hour

Image
I was always curious about the badges that some Github repositories sport. Largely, the badges are related to continuous integration and automated tests. I thought of exploring some of the cloud based tools related to engineering a piece of software. I was pleasantly surprised at the variety and ease of use of these tools.  To start with, I needed some code to start with. I already had Java based REST API that I use for trainings on Elasticsearch. My repository is at Github . I have integrated my repository with the following tools - Continuous Integration and Deployment - Travis-CI Code Coverage - Coveralls Cloud Provider - Heroku Depending on the type of application and programming language, all the above tools provide documentation on integration with Github. Based on the size of the code, it takes a few minutes for build, tests, code analysis and deployment steps to be executed. The application is finally deployed to heroku.  The diagram below describes the flow once a

Tech - xCloud Architecture (Part 4): At Your Service

Image
"The way to get started is to quit talking and begin doing.", Walt Disney. Let's start developing the e-commerce platform feature one at a time. Since, services are the centre of the platform, I initially built the basic set of services required, like - product, price, category, search etc. Building Blocks Identify the key building blocks of a service. Some of them could be - Programming language to be used, in this case it's  Python . Framework -  Flask . API Gateway to provide authentication, throttling, etc. -  3Scale . Logging provider -  Logentries . Provider - The provider under the service contains the business logic. I am going to take one service as an example - search. I used two providers -  Indexden  and  ElasticSearch . I will explain in a moment why. Anatomy of a Service All logos are registered/trademarked/copyright of the respective organizations. They are shown in the diagram above for ease of understanding. Handling Ch

Tech - xCloud Architecture (Part 3): The Best Laid Schemes Of Mice And Men

Image
So far, we have looked at the objective  and some principles . Now, to start executing the plan. The Team I now need a team and tools to start executing the plan. So, there's me and a mini-me. I am the team - product owner, designer, manager, architect, developer and support analyst all rolled into one. So far, I think we all got along just fine! The mini-me is the tools required - Acer Aspire One Netbook with 1.66 Ghz CPU, 2 GB RAM, 160 GB hard disk and a home broadband connection. Admittedly, the netbook is not the most powerful of machines. Since I use everything on the cloud, I was not too handicapped by the netbook. In terms of the software, all I used is - Node, Python, Notepad++, Git, Putty and the Appfog/Openshift command line tools. The Maneuvers It is said that, one of the reasons Napoleon was successful in his battles was the brilliant use of maneuvers. Although, he had a relatively smaller army, he used speed and flexibility to great effect. So, from

Tech - xCloud Architecture (Part 2): It's Elementary My Dear Developer

As I described in my earlier post , every component of the application needs to be in the cloud. Let's now get into the business of identifying the various cloud providers that we want to use. There are several factors to consider. Litany of Choices "When you see a web-based accounting system, the architecture of that system should scream accounting at you." - Uncle Bob . I am going to take a leaf from this quote. An application is always built to deliver a customer feature(s). And, almost always we will have constraints like time, cost, capabilities etc that we need to overcome. This forces us to prioritize the features, accept trade off's and focus on the most important aspects in the application.  The constraints also help us take decisions on Build vs Buy vs Rent. The Build here refers to building a bespoke software, Buy is buying an off the shelf software and Rent is renting a software on the cloud. On a similar note - Less critical feature of the a

Tech - xCloud Architecture: The Beginning (Part 1)

Image
It all started in the spring of 2013 when I came across an article on how Netflix was built on the Amazon cloud. It got me thinking about what is involved in building an entire application on the cloud. For example, what implications does it have on the following - If any, does it have any impact on the application features? What impact does it have on architecture principles? How do engineering practices need to evolve? Does it make it any easier to monitor, administer and support such an application? How does one handle data and security? Lastly, what were the trade-offs? So, I started reading up on the various cloud providers. These ranged from IaaS, PaaS and SaaS providers. I also looked at how organizations were leveraging these providers.  I jotted down a few architecture principles on which to build an entire application in the cloud. All resources, tools and technologies to be based in the cloud. Use a diverse set of cloud providers to test the interoperabil