Tech - Sprinkle some Salt - Part 1
Overview
With the advent of DevOps, many tools have come up on the topic of automation. These include tools such as Jenkins, TeamCity, Ansible, Chef, Puppet, Vagrant, Terraform etc. And, they are used to deploy infrastructure and applications.
However, once an infrastructure or application is deployed into an environment (Development, Testing, Production), there are changes made to it. The operations and/or site reliability teams may tweak operating system, application configuration to ensure that the environment is stable and functioning well. And, when these changes are made, the environment tends to 'drift' when compared to the source code or documentation.
This is where tools such as Salt Stack are useful. It is a tool from https://www.saltstack.com.
In this post, we will go over the basics of Salt Stack (also known as Salt).
- At a high level, Salt is a configuration management system.
- Like most other automation tools, it can deploy infrastructure / application.
- In addition, it can also monitor and react to various events. This greatly improves the life of the operations and site reliability teams.
Salt Architecture
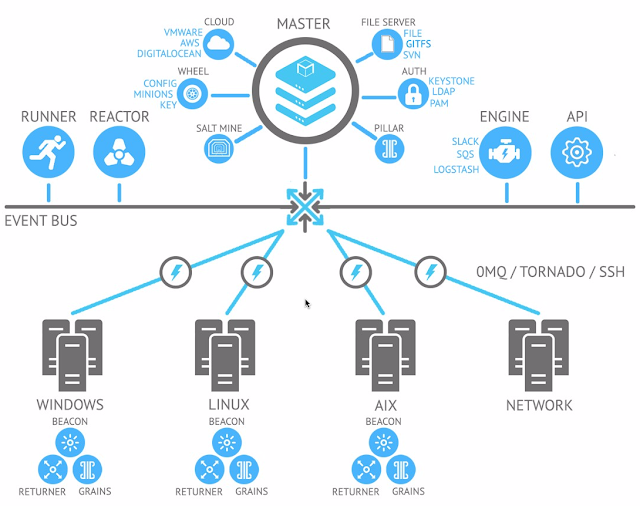
Salt is a versatile tool. As you can see from the architecture, Salt can be used to manage and monitor infrastructure in diverse scenarios -- on premise data centre physical servers
- on premise data centre virtual servers
- network switches, routers
- public cloud servers
- IoT devices
 |
| Image from Mirantis |
In a series of posts, we will see how Salt can be setup for managing virtual server and IoT devices.
Salt Concepts Covered
Each blog post in these series will cover the salt concepts incrementally. In this post, the following concepts are covered -- Salt Master - This is the master is used to send commands and configurations to the Salt minion that is running on managed systems.
- Salt Minions - This system runs the Salt minion which receives commands and configuration from the Salt master.
- Execution Modules - Ad hoc commands can be executed against the managed systems. These are typically used for - one-off commands, deploy software updates etc.
- Grains - Grains are the information underlying managed system and include operating system, memory, and many other system properties. One can also define custom grains for any system.
Pre-requisites
It may be best to have a few virtual or test machines for getting started with Salt. In this example, a bunch of virtual machines in Oracle Virtualbox are used.
- xubuntu-jumpbox - Acts as a Salt master server
- xubuntu-node1, xubuntu-node2, xubuntu-node3 - Act as a nodes in a server cluster
- All the virtual machines run xubuntu 18.04. They have multiple network interfaces such as - NAT and Host-Only. xubuntu is chosen here as they have a very light memory footprint.
- For fun, there is a Raspberry Pi 3 as well that acts as an IoT node.
- An SSH client such as Putty or Bitvise. In this series, Bitvise and Windows Subsystem for Linux in Windows are used as clients.
Installation
Salt has two key components - master and minion. Masters act as controllers and the minions acts as agents.
Login to the master node using an SSH client. Before installation, ensure that the ports 4505 and 4506 are open in the master node, in this case xubuntu-jumpbox. The command to open ports in firewall is '
sudo ufw allow 4505:4506/tcp'. Check the status of the firewall using 'sudo ufw status'.
Add the salt repository using the command - '
sudo add-apt-repository ppa:saltstack/salt'.
Next, run the command - '
sudo apt-get update'.
Finally, run this command to install salt master - '
sudo apt-get install salt-master -y'.
Edit the salt master configuration file by this command - '
sudo nano /etc/salt/master'. Add the host-only ip address of virtual machine to this file.
Restart salt master using the command - '
sudo systemctl restart salt-master'.
Run '
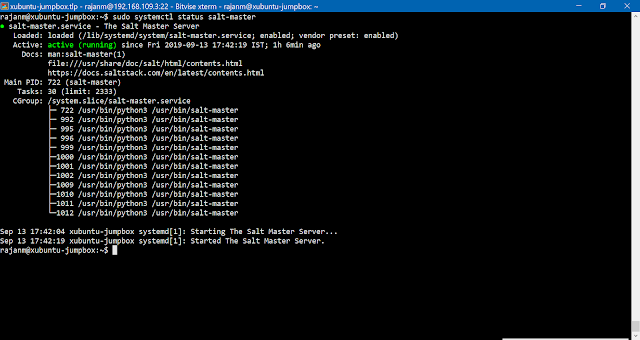
sudo systemctl status salt-master' to view details of the service.
Next run this command - '
sudo salt-master --version'.
Now, that the master is setup, let's start installing the minions. Start the other virtual machines in virtualbox. Login to them using the SSH client.
Add the salt repository using the command - '
sudo add-apt-repository ppa:saltstack/salt'.
Next, run the command - '
sudo apt-get update'.
Finally, run this command to install salt master - '
sudo apt-get install salt-minion -y'.
Edit the salt master configuration file by this command - '
sudo nano /etc/salt/minion'. Add the host-only ip address of virtual machine to this file.
Restart salt master using the command - '
sudo systemctl restart salt-minion'.
Run '
sudo systemctl status salt-minion' to view details of the service.
Once the salt-minion service is restarted, it would have sent the public key of the minion to the salt master. Repeat this process for all the nodes including the Raspberry Pi 3.
Similarly, the version of the minion can also be checked by '
sudo salt-minion --version'.
The request from the minion can be seen in the salt server by running the command - '
sudo salt-key -L'.
Now, run the command to add the minion to the Salt master - '
sudo salt-key --accept='raspberrypi-node1''.
Once the keys have been accepted in the salt master, the master can start interacting with all the nodes via the minions.
Salt comes with several pre-built modules. One of them is cmd. In this example, this module is used to run commands on all nodes - '
sudo salt '*node*' cmd.run 'sudo apt-get install nmon --upgrade -y' --output=pprint '. This command will run nmon tool on all the minions that have the text 'node' in their machine name.
Let's verify if the nmon tool has indeed been installed in the nodes. Login to one of the nodes and verify, in this case xubuntu-node3.
Let's try another command - '
sudo salt '*node*' cmd.run 'sudo apt-get update | sudo apt-get upgrade -y' --output=pprint '. As seen in this example, multiple commands are separated by the pipe operator.You can also run commands such as 'sudo salt '*' test.ping' and 'sudo salt '*' network.get_hostname' to view the status of the minions.
Summary
In this post, we have installed/updated software in 4 nodes (3 virtual machines and 1 Raspberry Pi) using 1 salt master. Imagine a scenario where, there are 100's or 1000's of machines that need to be maintained. It is in such scenarios that Salt proves it's usefulness.
It is possible to have masters in a high-availability mode, but that it out of scope of these posts. In addition to multi-master mode, it is also possible to federate the architecture using features such as Salt Syndic. To know more about Salt architecture and how it scales, you can read about it here.
If you are interested in a primer for the various salt modules and commands, you an refer the samples in my github gist. As and when I come across something useful, I will keep updating the gist.
More about other interesting features of Salt in the next post.


Comments
Post a Comment